A variety of Oracle databases remain on premises even though many organizations have mandates to move their mission-critical Oracle workloads to the cloud for financial and techno-strategic opportunities. In my last blog, I reviewed the value proposition of using SharePlex to migrate Oracle databases from on-premises to Azure with Silk. This blog will attempt to show the techniques involved to move an Oracle database from on prem to an Azure + Silk cloud solution using a replication technology software known as SharePlex. The use case scenario is to replicate the Hammer DB benchmark TPCC schema from one Oracle Linux server to another using a Silk Data Pod (SDP) as the underlying storage for the target database. This will show the basics of migration to Azure + Silk as well as highlight the interoperability and suitability for SharePlex as a primary migration tool to do this.
Moving a database from on-premises to the cloud is not as simple as some will tell you – it is no trivial task. This is especially true for Oracle database workloads. That is not say it is impossible. Several Oracle-native choices are available – namely Oracle DataGuard and Oracle Golden Gate. SharePlex represents another, perhaps more cost-effective, alternative – especially — to Golden Gate. Both Golden Gate and SharePlex do logical replication versus the physical replication of DataGuard. That means if you are considering replicating a subset of your on-premises database to the cloud, SharePlex coupled with Silk is an immediate option you should consider.
By subset, we mean the actual application schemas and data associated with your workload. In this use case, it is an admittedly simple 9 tables that are replicated. But in some use cases, this could be dozens of users and thousands of tables. SharePlex has a wildcard capability to handle this. The idea here is to move the application data and logic — NOT the physical database.
In our first scenario, we use a RMAN active duplicate command to instantiate the target database. There is no need to shut down the source server during this time, though it’s highly recommended no heavy activity or other maintenance be taking place. This RMAN duplicate job creates the database and brings with it the stored logic of the TPCC schema. Any changes to the metadata at this time are highly not recommended. Once the database is synchronized and in a steady state, normal DDL statements from the primary will update the stored logic of the target/secondary.
Golden Gate and SharePlex perform logical replication. That is, they capture and replay SQL statements extracted from the redo and archive logs. Oracle DataGuard, on the other hand, works lower and essentially does a block-by-block physical recreation of the database — not a logical one.
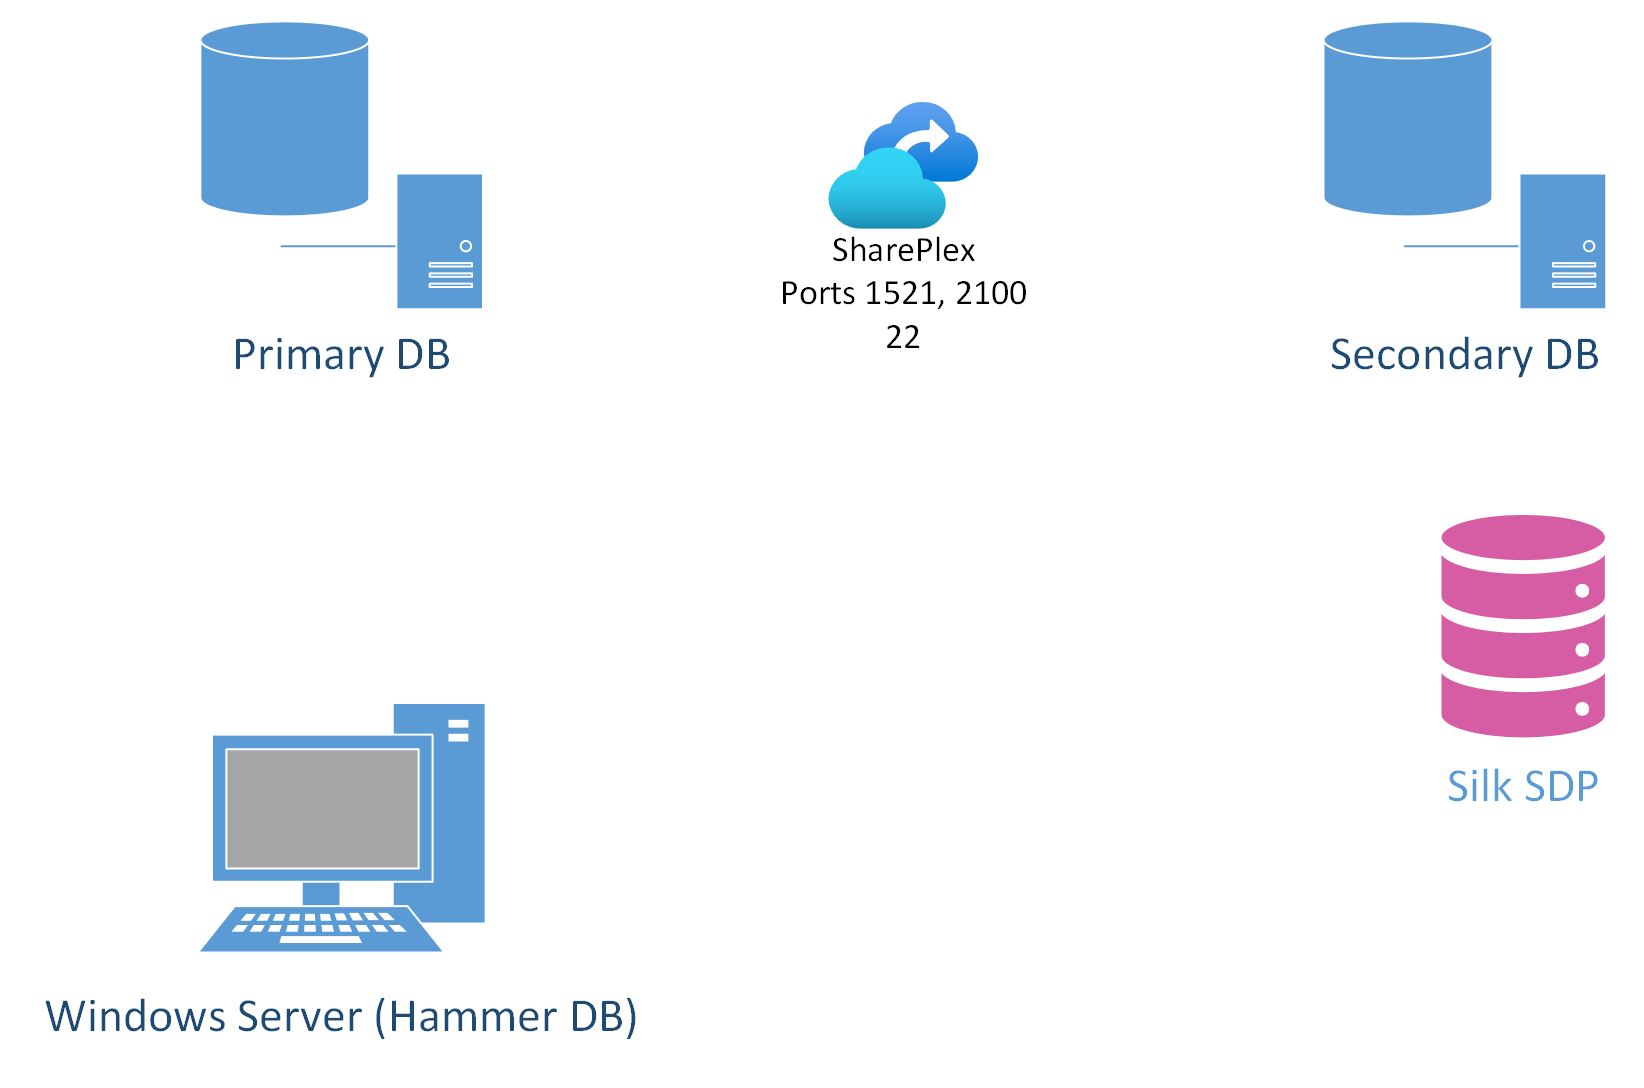
The initial database environment was set up on a RHEL 7 Linux server “swingbench2”. Another identical machine “swinchbench3” was also created in the same vnet for this demonstration. A third Windows workstation was setup and loaded with HammerDB to serve as the test harness.
Oracle RDBMS 19c ( 19.3.0.0.0) was installed on both Linux servers. SharePlex 10.2.0 was also installed and configured on both machines. On the primary (swingbench2), an initial Oracle database was created using a premium disk and LVM. Next, a HammerDB TPCC database of 10 warehouses was loaded onto the primary system. All the data files on the primary system are on file system storage. On the secondary, ASM coupled with Silk comprise the storage subsystem.
contents of etc/hosts
[oracle@swingbench2 bin]$ cat /etc/hosts
127.0.0.1 localhost localhost.localdomain localhost4 localhost4.localdomain4
::1 localhost localhost.localdomain localhost6 localhost6.localdomain6
xxx.10.1.8 swingbench3.internal.cloudapp.net swingbench3
xxx.10.1.7 swingbench2.internal.cloudapp.net swingbench2
Once everything was set up, the duplication of the environment on the secondary server began. Again, in this scenario we are simulating a database migration of an on-premises database with file system storage to Azure + Silk running under ASM. Both the /etc/hosts file and the tnsnames.ora file must have resolvable FQN entries in them.
SharePlex has no dedicated initial load tool, so an RMAN active duplicate operation was employed to recreate the secondary target database for the first iteration of the test. The first step to doing this was to set up the network and SQLNET connectivity. Note that on el7.x86_64 firewall is running by default and will block ports 1521 (SQLNET) and 2100 (needed for SharePlex). Configure these ports to be open in the firewall or disable the firewall. Note that disabling the firewall is only recommended for test environments.
One important note here. Use Fully Qualified Names (FQN) everywhere. Originally the configuration was set up with hard-coded private IP addresses, and though SQLNET connectivity was working fine. SharePlex couldn’t properly resolve IP addresses. Using FQNs in /etc/hosts and tnsnames.ora solved this problem.
Here is what the tnsnames.ora file looks like
SPLEX =
(DESCRIPTION =
(ADDRESS_LIST =
(ADDRESS = (PROTOCOL = TCP)(HOST = swingbench2.internal.cloudapp.net)(PORT = 1521))
)
(CONNECT_DATA =
(SERVICE_NAME = SPLEX )
)
)
TEST=
(DESCRIPTION =
(ADDRESS_LIST =
(ADDRESS = (PROTOCOL = TCP)(HOST = swingbench2.internal.cloudapp.net (PORT = 1521))
)
(CONNECT_DATA =
(SERVICE_NAME = TEST)
)
)
Here the source is called “SPLEX” and the target is “TEST”. Note the fully qualified host names. This is critical.
There is also a static entry in the target listener that must be configured to support the AUX instance for duplication.
SID_LIST_LISTENER =
(SID_LIST =
(SID_DESC =
(GLOBAL_DBNAME = TEST )
(ORACLE_HOME = $ORACLE_HOME )
(SID_NAME = TEST )
)
)
Copy a skeleton init.ora to the target host in preparation of starting an auxiliary duplicate instance. This requires one entry –db_unique_name.
This is also critical; the password file must be copied via scp to the target host from the source. Running the orapwd command in both environments and entering identical passwords will not work – it must be the exact copy via scp or sftp.
Now that everything is staged, the actual RMAN duplicate from AUX active can be performed.
First, we must be connected to the primary and aux instances:
The source database:
Connect target /
Then the aux instance:
connect auxiliary sys/<password>@(DESCRIPTION=(ADDRESS=(PROTOCOL=TCP)(HOST=swingbench3.internal.cloudapp.net)(PORT=1521))(CONNECT_DATA=(SERVER=DEDICATED)(SERVICE_NAME=TEST)(UR=A)))
There are two things to note about the aux connection. First, I’ve used an FQN in the host entry and second the UR=A parameter is critical. The RMAN duplicate process will stop and start the aux instance repeatedly. The UR=A parameter seems to aid it in being able to restart the instance.
Once all the above is accomplished, we also ensure the database is in archivelog mode and ready to be duplicated. If the file systems match on source and target, it is a very straight forward RMAN command. On the source system, connected to both source and AUX in RMAN as above, we execute the following command:
duplicate target database to ‘TEST’ from active database nofilenamecheck;
This will make a copy of the live database with a Point In Time recover Interval marked by the beginning of the backup. In this case, the file systems on source and target match so the parameter “Nofilenamecheck” is used. If we were to rename/relocate those datafiles the parameter “db_file_name_convert” would be used.
Once the RMAN duplicate command has completed, we can prepare the database for Change Data Capture replication. First, we add supplemental logging. As a DBA user, enter the following command in SQLPLUS to enable supplemental logging:
ALTER DATABASE ADD SUPPLEMENTAL LOG DATA;
With that, your Linux-to-Linux data replication baseline target is established. This is ideal for Linux-to-Linux migrations using the same software levels and similar OSs and OS levels. RMAN duplicate is perfect for creating a physical copy of your database right down to the exact version of the RDBMS. On the other hand, Oracle Data Pump — while somewhat slower and more cumbersome — allows greater flexibility including upgrade/migration capabilities and endian conversion. For instance, you can use Oracle Data Pump to export/import a Solaris based Sparc server running Oracle to a X86_64 Server running Linux. Subsequently you can use SharePlex for your CDC mechanism until cutover is achieved.
Using Data Pump for Initial Population
On the second iteration, the Oracle impdp/expdp utilities were employed instead of RMAN duplicate. On the target pre-created database, the required tablespace was created and the TPCC user was created with DBA privileges temporarily. On the source data side, an Oracle Directory had to be created:
SQLPLUS>Create directory tpcc_dmp as “/mnt/resource’;
Note that TPCC is a highly privileged user and no further permissions are needed. You may need to temporarily promote your application schema’s security profile to create directories and run Data Pump. Once the directory is created and privileges are verified, the expdp utility is invoked. In its simplest form it looks like this:
expdp tpcc/<passwd>@SPLEX directory=tpcc_dmp schemas=tpcc log=tpcc_exp.log
This will create a single large dumpfile of both the application logic, DDL for the tables, and the data itself. Various parameters can be applied to parallelize this process and write to multiple files simultaneously. This is especially important with large data sets.
The output of a successful export will look something like this:
Connected to: Oracle Database 19c Enterprise Edition Release 19.0.0.0.0 – Production
FLASHBACK automatically enabled to preserve database integrity.
Starting “TPCC”.”SYS_EXPORT_SCHEMA_01″: tpcc/********@SPLEX schemas=TPCC directory=SPLEX_DMP dumpfile=SPLEXC.dmp logfile=expdpSPLEX.log
Processing object type SCHEMA_EXPORT/TABLE/TABLE_DATA
Processing object type SCHEMA_EXPORT/TABLE/INDEX/STATISTICS/INDEX_STATISTICS
Processing object type SCHEMA_EXPORT/TABLE/STATISTICS/TABLE_STATISTICS
Processing object type SCHEMA_EXPORT/STATISTICS/MARKER
Processing object type SCHEMA_EXPORT/USER
Processing object type SCHEMA_EXPORT/SYSTEM_GRANT
Processing object type SCHEMA_EXPORT/ROLE_GRANT
Processing object type SCHEMA_EXPORT/DEFAULT_ROLE
Processing object type SCHEMA_EXPORT/TABLESPACE_QUOTA
Processing object type SCHEMA_EXPORT/PRE_SCHEMA/PROCACT_SCHEMA
Processing object type SCHEMA_EXPORT/TABLE/TABLE
Processing object type SCHEMA_EXPORT/TABLE/COMMENT
Processing object type SCHEMA_EXPORT/PROCEDURE/PROCEDURE
Processing object type SCHEMA_EXPORT/PROCEDURE/ALTER_PROCEDURE
Processing object type SCHEMA_EXPORT/VIEW/VIEW
Processing object type SCHEMA_EXPORT/TABLE/INDEX/INDEX
. . exported “TPCC”.”STOCK” 295.4 MB 1000000 rows
. . exported “TPCC”.”ORDER_LINE” 177.7 MB 2999500 rows
. . exported “TPCC”.”CUSTOMER” 158.1 MB 300000 rows
. . exported “TPCC”.”HISTORY” 14.30 MB 300000 rows
. . exported “TPCC”.”ORDERS” 9.833 MB 300000 rows
. . exported “TPCC”.”ITEM” 7.232 MB 100000 rows
. . exported “TPCC”.”NEW_ORDER” 1.206 MB 90000 rows
. . exported “TPCC”.”DISTRICT” 18.28 KB 100 rows
. . exported “TPCC”.”WAREHOUSE” 9.359 KB 10 rows
Master table “TPCC”.”SYS_EXPORT_SCHEMA_01″ successfully loaded/unloaded
******************************************************************************
Dumpfile set for TPCC.SYS_EXPORT_SCHEMA_01 is:
/mnt/resource/SPLEXC.dmp
Job “TPCC”.”SYS_EXPORT_SCHEMA_01″ successfully completed at Thu Sep 22 21:31:15 2022 elapsed 0 00:00:57
The row counts and data size are good facts to know when sizing the target.
Once the target is prepared, the dumpfile needs to be sftp transferred or otherwise moved to the target server for loading. For optimal performance, we recommend a Silk I/O volume so the load will proceed as quickly as possible. Avoid NFS mounted volumes — the performance will almost surely be an issue.
After sftp completes successfully, we set up the target database with its own Oracle Directory to accommodate the impdp utility. Impdp is the complementary utility used to load dumpfiles previously created by the expdp utility. It too needs an Oracle directory:
Create directory tpcc_imp_dmp as directory ‘/mnt/resource’
Now run the imdp utility:
Note that SharePlex requires the korn shell. Everything done below is in that shell.
Invoke the primary process “sp_cop” on both source and target. This should be backgrounded with the ampersand parameter thus:
$SHAREPLEX_HOME/bin/sp_cop -n 2100 &
We now invoke the Shareplex utility sp_ctrl to create a configuration. There is only one configuration file to edit — a refreshing difference from Golden Gate.
sp_ctrl (swingbench2.internal.cloudapp.net:2100)> edit config tpcc_config
We next create the following entries. The expand keyword uses the % sign as a wild card so that the entire TPCC schema will be replicated. We will also grab the splex.demo_src table as a testing mechanism.
Datasource:o.SPLEX
expand tpcc.% tpcc.% swingbench3.internal.cloudapp.net@o.TEST
splex.demo_src splex.demo_dest swingbench3.internal.cloudapp.net@o.TEST
~
Note the fully qualified hostnames – critical in the Azure cloud environment.
Once we’ve edited a config file, we next validate it with the verify config command:
sp_ctrl (swingbench2.internal.cloudapp.net:2100)> verify config tpcc_config
Config tpcc_config is valid
View detailed config in /mnt/resource/shareplex_var/temp/tpcc_config
If all is good the next step is to activate config:
sp_ctrl (swingbench2.internal.cloudapp.net:2100)> activate config tpcc_config
Finally, we can show config:
sp_ctrl (swingbench2.internal.cloudapp.net:2100)> show config
Tables Replicating with Key:
“TPCC”.”CUSTOMER” KEY: C_ID,C_D_ID,C_W_ID
“TPCC”.”DISTRICT” KEY: D_ID,D_W_ID
“TPCC”.”ITEM” KEY: I_ID
“TPCC”.”WAREHOUSE” KEY: W_ID
“TPCC”.”STOCK” KEY: S_I_ID,S_W_ID
“TPCC”.”NEW_ORDER” KEY: NO_W_ID,NO_D_ID,NO_O_ID
“TPCC”.”ORDERS” KEY: O_ID,O_W_ID,O_D_ID
“TPCC”.”ORDER_LINE” KEY: OL_W_ID,OL_D_ID,OL_O_ID,OL_NUMBER
Tables Replicating with no key:
“TPCC”.”HISTORY”
“SPLEX”.”DEMO_SRC”
File Name :tpcc_config
Datasource :SPLEX
Activated :19-Sep-22 20:56:14
Actid :8
Total Objects :10
Total Objects Replicating :10
Total Objects Not Replicating :0
View config summary in /mnt/resource/shareplex_var/log/SPLEX_config_log
This command gives us a plethora of information about the configuration and status of it. A total of 10 objects are being replicated. Eight of them have primary keys, two do not. It also shows the location of the log file and time activated. It also reports of objects that are not replicating and may have an issue.
l, 2097148 free, 0 used. 14835148 avail Mem ache
Conclusion
SharePlex is a powerful but simple replication tool ideally suited to help organizations migrate from on-premises Oracle databases to Azure + Silk IaaS solutions via SharePlex. The simplicity and straightforward setup of SharePlex belies its power and speed. Database migration/upgrades and endian conversions of legacy systems are possible with a combination of SharePlex, Oracle tools, and Silk + Azure. SharePlex coupled with Silk + Azure for top performance and functionality deserves careful consideration as the migration tool of choice. Click here to learn more about what Silk can do for Azure.